Audacity Tip: Cleaning up Scratches
.figure {
display: block;
text-align: center;
}
.caption {
font-style: italic;
}
Just something I discovered recently while using Audacity to clean up some old vinyl recordings:
The Click Removal tool does a darn good job of cleaning up most scratches, but not all. IME it’s still necessary to go back after it to fix what it missed (I find that the Repair tool works well for small scratches).
Unfortunately, a lot of scratches are hard to see with the default waveform view: a scratch can have a small amplitude (smaller than the clean waveform around it); it’s annoying because it shows up as a short burst of white noise in the middle of a tune.

The black bars mark the location of an audible but invisible click.
However, white noise shows up as a vertical bar in spectrum view. So what I did was:
- Duplicate the track I’m cleaning up.
- Mute the copy.
- Switch the copy to spectrum view; leave the original in waveform view.
That way, you can zoom out and easily find scratches on the spectrum view. By the time you zoom in and the spectrum becomes too smeared out to be useful, you can see the scratch in the waveform view, so you can fix it.

In spectrum view, the scratch is clearly visible as a bar that goes all the way to the top.
The downside of this technique is that Audacity has to do lots of FFTs to show the spectrum. So you may want to use a fast machine for this.
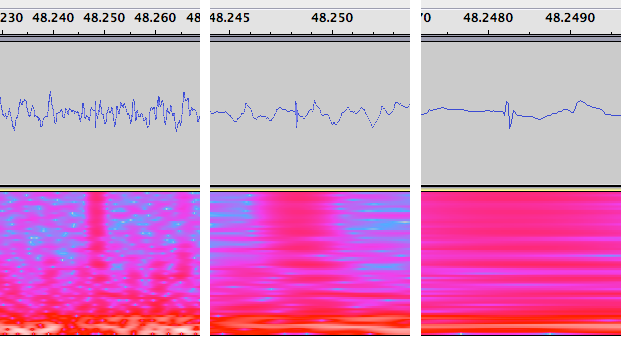
As we zoom in, the spectrum becomes too smeared out to be useful, but in waveform view, the scratch becomes obvious.
The other downside, of course, is that since you can see a lot more flaws, it takes ten times longer to fix a track.
I really like how you explain static & click removal steps but, honestly is there a page 2 to your instructions or did I miss something really big. I don’t see how to actually clean the scratch noise. Can you please reply to my email above. I have an old record that has scratches throughout most of it, I’ll be happy to at least reduce the scratches since I know it’s impossible to totally remove them!
I’d really appreciate it if you would kindly explain how to actually remove the scratch or clean them using what?
Thank you
Esha, if you’re still curious a year and a half later (or if others see this), here’s what to do:
See the little up, big down, little up pulse in the closest view (on the right)? That’s the pop in the recording. A wave form like that repeated regularly for a while would sound like an instrument with a lot of harmonics (maybe a horn). But a single pulse like that just sounds like a pop or click — a bit of dust in the groove of a vinyl record, or maybe a tiny pit or scratch. In any case, you don’t want it unless you want the recording to sound like dirty vinyl.
To get rid of it, check the Audacity tutorial page titled “Tutorial – Click and pop removal techniques”. For one like this example, I’d guess the “Repair” or “Draw” tool would work best, but it’s hard to tell without experimenting on the actual sound file.
Good luck!